
Anyone who uses a computer knows that performing tasks that require multiple mouse clicks can be very tedious auto clicker for chromebook. Whether you’re using your device’s built-in mouse, screen, or external mouse, repetitive clicking can damage your fingers. That’s why for gamers or other computer users who perform tasks by clicking photos, documents, or websites, an auto clicker is an essential tool. If you use a Chromebook, this article will tell you what you need to know about Auto Clicker for Chromebooks, as well as why and how to install it on your device.
What is an auto clicker?
An auto clicker is a package that automates mouse ticks, though the cursor is stationary for a while. This is a great tool for making continuous clicks in games or when using apps that require repeated clicks.
With an auto clicker, you can lessen, focus on other tasks and let the computer take instructions through automatic clicks. There is no limit on the number of clicks since the tool’s algorithm allows you to perform as many clicks as necessary to complete the task.
Auto clickers can be called artificial intelligence systems or intelligent software. They offer an advanced, thoughtful, and highly efficient virtual mouse that automates mouse clicks on your computer screen—faster and easier than a human clicking. Whenever your cursor is inactive or stationary for some time (say 3-5 seconds), the auto clicker will be activated.
Auto Clicker for Chromebook
If you use a Chromebook, like other computer users, you click the mouse (or on-screen cursor) a lot. For tasks that require high clicks per second (CPS), an automatic clicker makes sense.
You can significantly improve your CPS and achieve unprecedented click rates by installing an auto-clicker on your Chromebook. It’s efficient, fast, and reduces the load when running a Chrome web app.
Because it has improved targeting capabilities, it works more efficiently than a regular mouse. As a result, if your mouse stops snapping for a while, the auto-clicker will work and automatically start clicking on the monitor.
There are auto clickers that are compatible with Chrome OS and are specifically designed for Chromebook users. Besides their unique compatibility with Chrome, these auto-clickers do the same job as auto-clickers for Windows or other operating systems. That is, performing the often tedious task of constantly and systematically clicking the mouse.
Uses of Auto Clicker for Chromebook
If you’re a gamer and regularly play games to test your clicking speed on your Chromebook, using an auto clicker is an obvious necessity. However, even if you don’t play games, you’ll find Autoclicker useful for doing basic tasks inside your Chromebook. Some options for using an auto clicker for Chromebooks are:
- The obvious thing is that Autoclicker is most useful for gamers who have a lot of games installed on their Chromebooks that require constant clicking of the mouse. If you fall into this category, you will appreciate how a clicker allows you to target your targets better, thereby improving your score.
- Your Chromebook auto-clicker can automatically reload the webpage you’re on. So, if, for example, you constantly click the enliven icon to get a link, an email, or something else, just let the autoclicker do it for you.
- If you often shop online, sales and discounts are sure to please you. With an automatic clicker, you can get the offers you’ve always dreamed of. This will be especially useful if you are on a shopping site that requires quick clicks to get discounts.
- Automatic clickers can also help Chromebook users stay active on their computers. As a result, you can use Auto Clicker on your Chromebook when you’re away from your computer but don’t want to be unplugged or idle. By continuously clicking on your computer after a set period, an auto clicker can keep your laptop active and make it appear as if you are online and working.
- If you often use Google Sheets to enter data, the auto clicker will help you move from one cell to another faster. You don’t have to type duplicate content or manually copy and paste constantly. An automatic clicker will save you from this problem.
- All other tasks on a Chromebook that require clicking—turning pages in an e-book, viewing a photo gallery, scrolling through web pages, etc.—are easier and faster to do with an auto clicker.
Features of auto clickers
All automatic clickers have the same basic functions, namely:
- Minimal CPU usage (and this is countless for Chromebooks since they aren’t exactly “powerful” computers)
- The software extension is portable.
- Free and open-source tool
- No ads or malware
- Clean user interface
- Ability to follow the pointer and click on an area
- Easy programming (You can set the number of clicks as well as the time between clicks. The duration between clicks can be milliseconds or delayed for minutes or hours. Clicks can also be set to single, double, or even triple click patterns.)
Advantages of using Auto Clicker for Chromebook
The use of auto clickers for Chromebooks has increased in recent times due to the benefits that users get from it. Let’s look at some of these benefits.
- Firstly, this is its universal function. Auto clicker software is feature-rich and can be used with almost all applications on the device, as well as web pages.
- It’s easy to use. Auto clicker is a simple answer that works on almost any interface. As a result, it is ideal for beginners.
- Autoclickers save energy. You, your fingers, and your mouse can spend several minutes clicking when you use an automatic clicker.
- Because you don’t have to waste energy or slow down when you’re tired, using an auto clicker is a faster way to get things done.
- This allows you to perform multiple jobs at the same time. In addition, it will enable you to attain complex tasks (such as bulk data entry) with ease.
- The automatic clicker is useful for Chromebook users with motor impairments who find manual clicking difficult or impossible.
- The built-in auto clicker for Chromebooks and some other extensions has several functional tools in the toolbar. One of the functions allows you to track all your clicks and cursor movements.
- Autoclicker extensions are usually free and can be found in the Chrome Web Store or on software company websites. However, be careful with the latter, as some of them may contain malware or viruses. Ideally, all stores keep their files up to date. And if you want to regulate the number of clicks, the software often includes a special tool.
Steps on what way to download and install the Auto Clicker aimed at Chromebook
Several free and open-source auto clickers remain available to help you click on your Chromebook. Luckily, using any auto clicker software is easy. There are two ways to get and start using AutoClicker on your Chromebook. Only one of these methods will require you to find an automatic clicker to download and install. The other allows you to use the built-in automatic clicker. Let’s appearance at both procedures.
First Method: Usage the Chromebook’s built-in auto clicker
Your Chromebook has a built-in automatic clicker. This means that with the tool already available, you can easily change manual mouse clicks into smart mouse clicks with automatic features and customize them as you wish.
Here’s how to turn your mouse into an auto-clicker using the built-in auto-clicker:
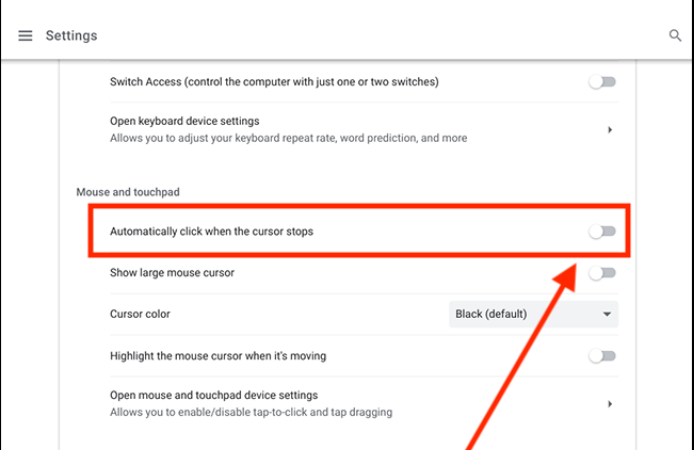
- Hold Alt+Shift+s on your console or energy to Time Settings.
- From the time settings menu, select Advanced.
- Find the Accessibility icon and choose Manage Accessibility from the drop-down menu.
- Expand “Mouse and Touchpad” and select the “Automatically click when the mouse pointer stops” option.
- You can now change the smart cursor to customize it to suit your preferences, although this is completely elective.
Second Method: Use an Auto Clicker intended for the Chromebook browser
This second method can be approved in two more ways. So, if the first method above does not suit you, you can choose the most convenient method from the two below:
Method 1: Activate Auto Clicker through Chrome Settings
- Step 1: Go to Settings in your Chrome browser.
- Step 2: On the left menu bar, choose Progressive from the drop-down menu.
- Step 3: Select “Availability” from the drop-down menu.
- Step 4: Select Manage Accessibility from the drop-down blackboard.
- Step 5 – Drive to the “Mouse and Touchpad” unit of the locations menu.
- Step 6: Find and activate the “Automatic click when mouse pointer stops” option.
Method 2: Activate Auto Clicker using Chrome Extensions
- Step 1: Go to Settings in your Chrome browser.
- Step 2: Go to the tariff bar on the left side of the screen and select Extensions. You’ll be taken directly to the Extension Manager page in Chrome.
- Step 3: Go to the lowest left corner of the menu bar and select Exposed Chrome Web Store.
- Step 4: Type “Autoclicker” into the search box, and the results will appear immediately.
- Step 5: To use auto-click, right-click on any search result and select Add to Chrome.
- Note that one of the advantages of auto clicker extensions over the built-in auto clicker is that auto clicker, downloaded and installed through Chrome extensions, gives you more settings and features.
How to Customize the Auto Clicker Arranged Your Chromebook.
If you are not happy with the current auto clicker features (which work by default), you can change them to your liking. Below are the features you can configure to set up an auto clicker on your Chromebook:
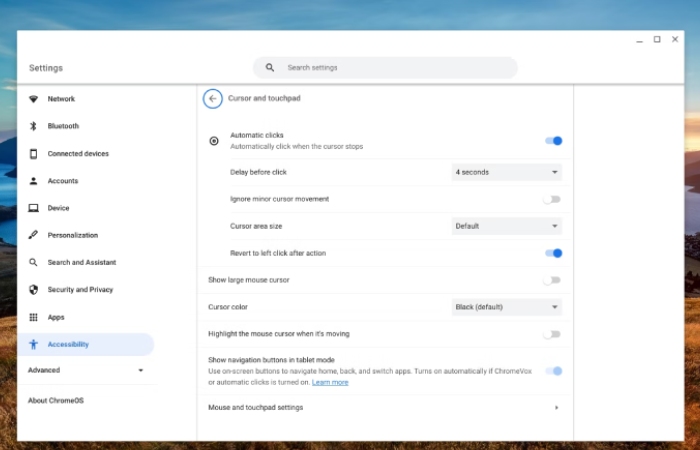
- Pre-Click Delay: Determines how long the cursor can remain idle or unattended before the automatic clicker is activated. In the Mouse and Touchpad settings, click Latency. Then, after the drop-down list that appears, select a delay period from 0.6 to 4 seconds, depending on the task for which you intend to use the auto clicker.
- Stabilizing the click location. Activate Stabilize Click Location. If you poverty, the auto-clicker ring will remain stationary until you move the cursor outside the ring.
- Return to left click. If you enable the “Return to left-click after action” switch, every time you complete a mouse action, such as double-clicking or right-clicking, the auto-clicker will revert to left-clicking.
- Movement threshold. Your click movement threshold is the inverse of your pre-click Latency. This refers to how many times you move the cursor before leaving it alone. Once the cursor movement reaches this threshold, the automatic clicker will start clicking.
Popular Auto Clicker Options for Chromebook
When discussing popular auto-clicker options for Chromebooks, it’s important to reflect on the compatibility of these tools with Chromium OS, as well as their specific topographies and limitations. Below is an overview of some commonly used auto-clicker apps and extensions suitable for Chromebooks:
GS Auto Clicker
- Features: Easy to use, allows users to customize the press sequence, supports hotkey activation for quick start/stop.
- Limitations: We may lack advanced customization options available in more complex auto-clickers.
AutoClicker by MurGaa.com
- Features: Offers both simple and multifaceted click orders, customizable click intermissions, and the ability to save locations for future use.
- Limitations: Full functionality may require a paid license and may be a bit difficult for new users.
Click Assistant – Auto Clicker
- Features: The Android app is compatible with Chromebooks, allows you to customize pressure points and swipe gestures, and provides a user-friendly interface.
- Limitations: As an Android app, its functionality may be limited by Chromebook hardware.
Auto Clicker – Automatic Tap
- Features: Another Android app option for Chromebooks. It is easy to set up and use and is useful for repetitive tasks.
- Limitations: No advanced features or customization options, not suitable for complex auto-clicking tasks.
Chromebook Auto Clicker Extension
- Features: Browser extension designed specifically for Chromebooks, simple Chrome browser integration, and ease of use.
- Limitations: Limited to browser actions, may not work in desktop applications.
AutoClicker Professional for Windows
- Features: Highly customizable, including features such as click sequence recording and variable click rate settings.
- Limitations: Installing Windows software requires running Chrome OS in developer mode, which may pose a security risk.
Each of these autoclickers has a unique set of features and limitations. Users should select based on their specific needs, such as the complexity of the tasks for which they need the auto clicker and their comfort level with adjusting the software’s settings. It’s also important to consider the security implications, especially when using tools that require special consent or running your Chromebook in developer mode.
Safety and Security Considerations
When using automatic clickers on Chromebooks, it is important to prioritize the safety and security of your device and personal data. Here are some thoughts and tips:
Safety of using auto clickers on Chromebooks
- Compatibility and stability. Make sure your auto clicker is likeminded with Chromium OS to avoid system instability or crashes. Some auto clickers are designed for Gaps or other operating systems and may not work properly on Chromebooks.
- Permissions and access. Automatic clicks often require certain permissions to work. Be careful when granting broad permissions, especially if the tool requests admission to sensitive data or system settings.
- Source Reliability: Only download auto-clickers from trusted sources, such as the Chrome Web Store or authorized websites. Avoid transferring software from third-party websites that may contain malicious or unwanted software.
Tips for avoiding malware or security issues
- Learn the tool. Before downloading any automated clicker, research its reputation. Find reviews, ratings, and any reports of security issues from other users.
- Update regularly: Keep your auto-clicker and Chrome OS updated. Developers often release updates to fix vulnerabilities or improve security.
- Use security software. Take advantage of your Chromebook’s built-in security features and consider additional security extensions or anti-malware apps.
- Beware of phishing. Beware of automated clickers that ask for unnecessary personal information or lead to questionable websites.
- Risks of developer mode. Installing automated clickers that require your Chromebook to switch to developer mode may expose your device to security risks. Developer mode turns off some Chrome OS security features.
- Regular backups. Regularly back up significant data stored on your Chromebook to mist storage or an external drive. This ensures the safety of your data in case of any software problems caused by the automatic clicker.
- Performance Monitoring: Monitor your Chromebook’s presentation. If you notice rare behaviour, such as slow presentation or unexpected advertisements, this may indicate malware.
- Educate yourself: Be aware of common cybersecurity threats and how to prevent them. Knowledge is a powerful tool for digital security.
By following these guidelines, you can use automatic clickers more securely on your Chromebook, reducing the risk of malware contagions or other security issues. Always prioritize digital security and be wary of the package that interacts with your system at a deep level.
Legal and ethical considerations
The use of autoclickers involves both legal and ethical considerations, which may vary depending on the context in which they are used. Here is an overview of these features:
Legal Considerations
- Terms of Service Agreements. Many software requests, online platforms, and sports have Terms of Service (ToS) or Finish User License Agreements (EULA) that specifically prohibit the use of auto-clickers or similar automation tools. Violation of these terms may result in penalties such as account suspension or blocking.
- Workplace politics. In a work context, auto clicker use may violate company policy or employment contracts, especially if it is used to simulate activity or manipulate performance metrics.
- Intellectual Property Rights. Using automated clickers in a manner that interrelates with the package or digital content in a manner not intended by its creators may violate intellectual property rights.
Ethical considerations
- Fair Play: In games, using auto clickers to gain an advantage is generally careful and unfair to other companies who do not use such tools. This may disrupt the game balance and the experience of others.
- Honesty in the work environment. Using automated clickers to fake activity or artificially boost performance may be considered cheating. This undermines confidence in employees’ performance and integrity in their work.
- Educational Integrity: Students who use automated clickers to complete academic assignments may be found to violate academic integrity principles.
- Potential for abuse. There is a risk that automated clickers may be used for improper purposes, such as spamming websites, forums, or online surveys, which could result in negative consequences for that online community and service.
Balancing legal and ethical aspects
- Use in context. The appropriateness of using an automatic clicker depends largely on the context. For example, using it for personal tasks on your computer may be acceptable, while using it to manipulate public services or in a competitive environment is not.
- Transparency in the use of automation tools, especially at work or school, is important to maintaining ethical standards.
- Understand the consequences: Be aware of the possible penalties, both in terms of legal implications and in terms of personal or expert honesty.
While auto clickers themselves are not unlawful, their use can lead to legal and moral issues depending on how and where they are used. It is important to know and respect the rules and standards of the environment in which you plan to use the auto clicker.
Troubleshooting common problems
Troubleshooting common problems with auto clickers on Chromebooks involves addressing a variety of potential issues. Here are some solutions to common problems that users may encounter:
Auto Clicker Not Working
- Check compatibility. Make sure your auto clicker matches Chrome OS. Some auto clickers are intended for other operating systems and may not work on Chromebooks.
- Update your Chromebook. An older version of Chrome OS may cause compatibility issues. Make sure your Chromebook is updated to the latest version.
- Check permissions. If your auto-clicker requires specific permissions, make sure you grant them. Be careful with permissions, especially if they seem wide.
- Reinstall Auto Clicker: Uninstall and then reinstall Auto Clicker. This will solve the problems caused by the installation failure.
Auto Clicker Causing System Lag
- Close unnecessary tabs and applications. Running too many apps or browser tabs can slow down your Chromebook—close unused ones.
- Check CPU and memory usage. Use your Chromebook’s task manager to check if the auto-clicker is using too many system resources, and consider using a lighter alternative.
Inconsistent Clicking
- Adjust settings: If the automatic clicker is not clicking properly, change its settings. Problems often arise from incorrectly configured click intervals or patterns.
- Check for interference. Other extensions or applications may interfere with the automatic clicker. Try disabling other extensions provisionally to diagnose the problem.
Auto Clicker Stops Unexpectedly
- Check your power settings. Make sure your Chromebook’s power settings don’t interfere with auto-clicker functionality, such as going to sleep.
- Check for updates: Check to see if information is available for the auto-clicker, as updates may fix known bugs.
Auto Clicker Not Clicking Where Intended
- Click point calibration. If your auto clicker supports click point adjustments, recalibrate the click points. A mismatch may occur due to a change in resolution or incorrect settings.
- They are testing various applications. Some automatic clickers may not work correctly in certain applications. Test Autoclicker in different environments to determine if the problem is related to a specific application.
General Tips
- Read the documentation: Refer to the auto clicker help documentation or FAQs for specific troubleshooting tips.
- Ask the community for help. If you’re using a general auto clicker, chances are others have encountered similar problems and solved them. Find community forums or support groups.
- See Alternative Solutions. If a particular auto-clicker continues to cause problems, consider trying a different solution that may be more stable on Chrome OS.
By systematically addressing these common issues, you will be able to effectively troubleshoot and resolve most problems that arise when using automatic clickers on Chromebooks.
Alternatives to auto clickers
Autoclicker alternatives offer different ways to achieve similar results without relying on these specific tools. These alternatives may be particularly useful in contexts where automatic clickers may be inappropriate or prohibited. Here are some options:
Keyboard shortcuts and hotkeys:
- Many tasks that are typically automated using auto clickers can be done efficiently using keyboard shortcuts or hotkeys.
- This approach can be more accurate and less invasive and is often supported by a wide range of software and applications.
Built-in accessibility features:
- Most operating systems, including Chrome OS, include convenience topographies that can help automate or simplify tasks.
- Features such as mouse keys, sticky keys, or slow keys can be valuable for users who need help tapping or typing.
Browser extensions for specific tasks:
- Many browser extensions can automate certain tasks, such as filling out forms, repetitive browsing, or data entry.
- These extensions are often more beleaguered and can be a safer alternative to automated clickers.
Scripting and automation tools:
- Advanced users may consider using scripting languages such as Python before JavaScript to power tasks.
- Tools similar to AutoHotkey (for Windows) or AppleScript (for macOS) offer excellent scripting capabilities to automate complex tasks, although they may require some technical knowledge.
Task scheduler programs:
- Software that agendas tasks to run automatically at set areas can be a viable alternative, particularly for routine tasks.
- This method is intended not so much to simulate clicks but to automate entire processes or tasks.
Using macros in productivity software:
- Many office and productivity suites allow you to create macros to automate repetitive tasks.
- Macros can be used in programs such as Microsoft Excel, Google Sheets, or similar applications to mechanize data entry and dispensation tasks.
Workflow mechanization platforms:
- Stages like IFTTT (If This then That) or Zapier allow you to automate tasks across a variety of web services and applications.
- These platforms can automate complex workflows involving many steps and conditions.
Voice control and dictation:
- Using voice control or dictation tools can be a real way to navigate and control your computer without having to press buttons frequently.
- This approach is especially useful for users with mobility or dexterity issues.
Manual alternative
- Sometimes, simply adjusting the way you work or breaking tasks into smaller, wieldy chunks can reduce the need for constant keystrokes.
- Ergonomic equipment such as trackballs or ergonomic mice can also help make manual pressing less stressful.
Each of these alternatives has its own set of benefits and suits different needs and skill levels. They offer a wide diversity of options, from simple configurations to more complex automation solutions.
Conclusion
Of course, an auto clicker for Chromebook is definitely worth a try for users who love gaming or perform tasks that require tedious clicking multiple times. You will find that it reduces your effort and makes your activities more efficient and easier.
While you are performing other tasks, the auto clicker can perform the task of continuous clicking, allowing you to get maximum CPS speed without even touching a physical mouse.